This blog post is based on a talk I did on AWS CloudFormation as an introduction.
The case for Infrastructure as Code
Imagine a typical deployment of a software stack. The process might look like the following.
- Design solution architecture
- Estimate infrastructure specs
- Configure compute, network, and database resources manually
- Deploy the applications and prepare databases
- Test and ship
Pretty simple from the looks of it doesn’t it? The catch is this. This is just half of the solution maintenance. There are several more scenarios involved that can quickly turn this in to a complex fragile piece of engineering.
- Deployments need to be upgraded both at application and utility levels. These upgrades usually tend to go sideways especially if migration tasks are not clear at the beginning.
- Vendor provided patches sometimes have to be verified on top of production systems, as they are the only environments that produce certain error situations.
- An OS or pre-requisite package upgrade could bring in unforeseen API breakages.
In above cases, almost always, there is no way to roll back to a stable state quickly, as the configuration changes that are involved are complex and numerous. They are non-trivial to trace back from.
From a point of view where this fragile nature of the configured environment is considered, there are two phases to the above mentioned deployment process.
- Infrastructure and deployment provisioning
- Application provisioning
The latter is almost always automated, using a Configuration Automation tool like Puppet, Chef, or Ansible (WSO2 provides Puppet modules that address this scenario for WSO2 products), while the former mostly remains as a manual task.
So what’s wrong with manual configuration?
Aside from the cumbersome maintenance involved, manual configuration almost always leads to a state that is now famously named “Snowflake” servers.
Martin Fowler describes Snowflake servers as follows.
Snowflakes soon become hard to understand and modify. Upgrades of one bit software cause unpredictable knock-on effects. You’re not sure what parts of the configuration are important, or just the way it came out of the box many years ago. Their fragility leads to long, stressful bouts of debugging. You need manual processes and documentation to support any audit requirements. This is one reason why you often see important software running on ancient operating systems.
In other words, making configuration changes on the running system is a trail-less, mostly in-auditable task that could potentially ruin a system that should be best left untouched, like a unique Snowflake. Once it’s ruined, you never reach the state it was when it was “perfect”. Even if you somehow manage to traverse the risk-filled path, you will ultimately end up at a state where even you don’t know what the logic was behind certain design and deployment decisions.
In contrast, Martin Fowler suggests the Immutable approach for deployments. Immutable servers’ configurations are not modified. Instead, their configurations lie outside of the actual deployment. These tools that manage externalized configuration are called Configuration Automation Tools. For immutable deployments to be changed, their external configuration has to be first changed. This demands disciplined and traceable actions. After the change is reviewed, it is applied on top of the deployment. This action mostly deploys new servers while taking down ones with the old configuration, hence causing the immutability of a deployed server.
For these tools to work with application configuration, they have to be codified in to a language that is understood by machines. Tools like Puppet and Chef use Domain Specific Languages while others like Ansible use templating tools and YAML. In any case, the configuration now exists as code.
The reason for the application provisioning to have such solutions while infrastructure layer doesn’t, is simple. The application layer was easy to orchestrate, interface with, and sysadmins have been struggling with them for quite a long time.
In contrast, it was not easy for an automation tool to interface with hardware resources, at least not until public Infrastructure as a Service offerings started to proliferate. IaaS providers such as AWS, Google Cloud provides APIs to work with their ranges of Services that tools could interface with and manipulate. This is why the requirement to codify the infrastructure layer’s configuration is being addressed now.
Up to now, without a language that is both understood by humans and machines, infrastructure had to be managed manually. Infrastructure as Code makes it easier instead to “orchestrate” your infrastructure so that once the codification is done, you can leave the heavy work for the tool while you monitor for any issues.
Infrastructure as Code means that the state of your deployment exists as code that is,
- Version managed
- Code reviewed
- Release managed
AWS CloudFormation
AWS CloudFormation is one of the pioneers in Infrastructure as Code, as CloudFormation existed as a Service in the stack in as far as 2011. It is an AWS specific service that allows you to define a deployment of AWS resources in to “Templates”, that once provided to the CloudFormation service will create “Stacks” that can be managed. Once these “Stacks” are deployed, it becomes far easier to manage the resources “Stack”-wise to (say) rollout application updates or manage resource limitations.
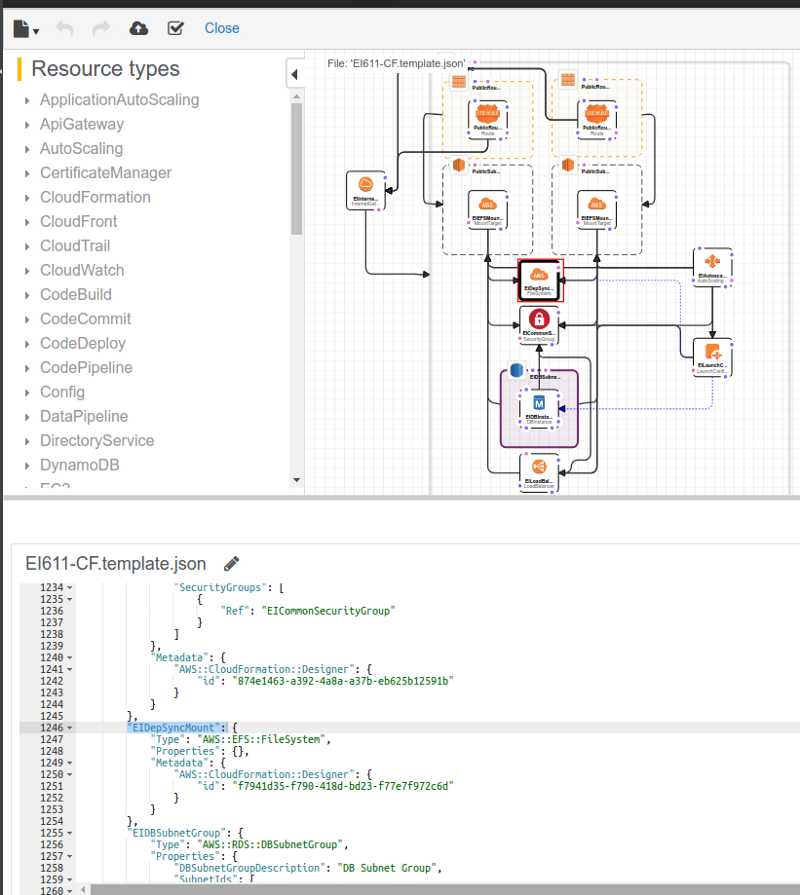
The resources and their metadata are defined in JSON or YAML files. There is little learning curve to get started because of this. AWS also provides a visual diagramming tool, that could improve a lot at the moment this is being written.
A CloudFormation (CF) template consists of several sections.
- Resources
Resources section is where the required AWS resources are defined, in any order. For example, if there is a need for an EC2 instance, an Elastic Load Balancer, and a Security Group to manage access, those can be defined in the Resources section as follows.
{
  "Resources": {
    "SampleEC2Instance": {
      "Type": "AWS::EC2::Instance",
      "Properties": {
        "ImageId": "ami-79fd7eee",
        "KeyName": "testkey",
        "SecurityGroup": {
          "Ref": "SampleSecurityGroup"
        },
        "BlockDeviceMappings": [{
            "DeviceName": "/dev/sdm",
            "Ebs": {
              "VolumeType": "io1",
              "Iops": "200",
              "DeleteOnTermination": "false",
              "VolumeSize": "20"
            }
          },
          {
            "DeviceName": "/dev/sdk",
            "NoDevice": {}
          }
        ]
      }
    },
    "SampleSecurityGroup": {
      "Type": "AWS::EC2::SecurityGroup",
      "Properties": {
        "GroupDescription": "Common Security Group",
        "VpcId": "SomeVPCID",
        "SecurityGroupEgress": [{
          "IpProtocol": -1,
          "FromPort": "0",
          "ToPort": "0",
          "CidrIp": "0.0.0.0/0"
        }],
        "SecurityGroupIngress": [{
            "IpProtocol": "tcp",
            "FromPort": "22",
            "ToPort": "22",
            "CidrIp": "0.0.0.0/0"
          },
          {
            "IpProtocol": "tcp",
            "FromPort": "443",
            "ToPort": "443",
            "CidrIp": "0.0.0.0/0"
          },
          {
            "IpProtocol": "tcp",
            "FromPort": "80",
            "ToPort": "80",
            "CidrIp": "0.0.0.0/0"
          },
          {
            "IpProtocol": "tcp",
            "FromPort": "3306",
            "ToPort": "3306",
            "CidrIp": "0.0.0.0/0"
          },
          {
            "IpProtocol": "tcp",
            "FromPort": "8080",
            "ToPort": "8080",
            "CidrIp": "0.0.0.0/0"
          },
          {
            "IpProtocol": "ICMP",
            "FromPort": "-1",
            "ToPort": "-1",
            "CidrIp": "0.0.0.0/0"
          }
        ]
      }
    },
    "SampleLoadBalancer": {
      "Type": "AWS::ElasticLoadBalancing::LoadBalancer",
      "Properties": {
        "CrossZone": true,
        "SecurityGroups": [{
          "Ref": "SampleSecurityGroup"
        }],
        "Subnets": [{
            "Ref": "PublicSubnet2"
          },
          {
            "Ref": "PublicSubnet1"
          }
        ],
        "LBCookieStickinessPolicy": [{
          "PolicyName": "LBStickyPolicy"
        }],
        "Instances": [{
          "Ref": "SampleEC2Instance"
        }],
        "Listeners": [{
            "LoadBalancerPort": "443",
            "InstancePort": "443",
            "Protocol": "HTTPS",
            "InstanceProtocol": "HTTPS",
            "PolicyNames": [
              "LBStickyPolicy"
            ],
            "SSLCertificateId": {
              "Fn::Join": [
                "", [
                  "arn:aws:iam::",
                  {
                    "Ref": "AWS::AccountId"
                  },
                  ":server-certificate",
                  "/",
                  {
                    "Ref": "CertificateName"
                  }
                ]
              ]
            }
          },
          {
            "LoadBalancerPort": "80",
            "InstancePort": "80",
            "Protocol": "HTTP",
            "InstanceProtocol": "HTTP",
            "PolicyNames": [
              "LBStickyPolicy"
            ]
          },
          {
            "LoadBalancerPort": "8080",
            "InstancePort": "8080",
            "Protocol": "TCP",
            "InstanceProtocol": "TCP"
          }
        ],
        "HealthCheck": {
          "Target": "TCP:80",
          "HealthyThreshold": "3",
          "UnhealthyThreshold": "5",
          "Interval": "10",
          "Timeout": "5"
        }
      }
    }
  }
}
In the above gist, note that resources are cross-referenced where needed. For example, the created EC2 Instance is registered at the Elastic Load Balancer as a back-end instance by the following property.
"Instances": [{ "Ref": "SampleEC2Instance" }],
Ref is a CloudFormation intrinsic function where different resources when called with, returns specific information. For EC2 instances, when referred to with Ref the instance ID is returned. A similar intrinsic function that is frequently used is Fn::GetAtt in which a specific attributed to be read can be defined.
{
    "Fn::GetAtt": [
        "SampleDBInstance",
        "Endpoint.Address"
    ]
}
To identify which of the details are returned for a Ref call and other functions, the Return Valuessection in the relevant API documentation page on the AWS CloudFormation API guide can be used.
The order in which the resources are defined is not relevant and does not determine the order in which the resources are created when the CF Template is run. CloudFormation parses the list of resources and identifies the dependencies between them, especially when there are cross references like the Ref function. The dependency tree created after this parsing is used to determine the order in which the resources are created.
2. Parameters
Parameters are similar to arguments that is passed in to a function upon invocation. Almost always a CloudFormation template has to make use of data that should be retrieved from the user. These data include values like the AWS KeyPair name, Certificate names, credentials to databases etc. These cannot be hard-coded in to a template.
Parameters are a way to make these data available from the user who is invoking the template. For an example, if the following parameter definition is included in a CF Template, the user will be prompted to enter a value to it, when the Stack creation initiates.
"Parameters": {
    "KeyPairName": {
        "Description": "The key pair to establish a SSH connection to the web servers. This should be already created.",
        "Type": "AWS::EC2::KeyPair::KeyName"
    }
}
The resulting screen looks like the following. Note that the field provided to the user is a drop-down box instead of a text-field. This is because, the Type of the parameter is defined as AWS::EC2::KeyPair::KeyName. CF interprets this and provides list of Key Pairs available in the user’s account to be selected for convenience.

The parameters can then be refered to inside the Resources as needed. For an example, to create an EC2 Instance, the above provided KeyPair name should be used.
"KeyName": {
    "Ref": "KeyPairName"
},
The same function as above, Ref is used here.
It is possible to manipulate the User Interface that prompts the user for Parameter input through the use of
AWS::CloudFormation::Interfaceresource inMetadatasection, including changing field names, descriptions, grouping of Parameters and their order of appearance.
3. Outputs
Outputs are the opposite of Parameters in terms of functionality. A CF Template’s Outputs are its return values. For an example, if the following CF Template that contains the above Resources block along with an additional Outputs block that contains the Elastic Load Balancer’s Public DNS name, then that value could be used by another CF Template (which is possible. A CF Template can include another CF Template via the use of a Stack resource type) that includes this one.
{
  "Resources": {
    "SampleEC2Instance": {
      "Type": "AWS::EC2::Instance",
      "Properties": {
        "ImageId": "ami-79fd7eee",
        "KeyName": "testkey",
        "SecurityGroup": {
          "Ref": "SampleSecurityGroup"
        },
        "BlockDeviceMappings": [{
            "DeviceName": "/dev/sdm",
            "Ebs": {
              "VolumeType": "io1",
              "Iops": "200",
              "DeleteOnTermination": "false",
              "VolumeSize": "20"
            }
          },
          {
            "DeviceName": "/dev/sdk",
            "NoDevice": {}
          }
        ]
      }
    },
    "SampleSecurityGroup": {
      "Type": "AWS::EC2::SecurityGroup",
      "Properties": {
        "GroupDescription": "Common Security Group",
        "VpcId": "SomeVPCID",
        "SecurityGroupEgress": [{
          "IpProtocol": -1,
          "FromPort": "0",
          "ToPort": "0",
          "CidrIp": "0.0.0.0/0"
        }],
        "SecurityGroupIngress": [{
            "IpProtocol": "tcp",
            "FromPort": "22",
            "ToPort": "22",
            "CidrIp": "0.0.0.0/0"
          },
          {
            "IpProtocol": "tcp",
            "FromPort": "443",
            "ToPort": "443",
            "CidrIp": "0.0.0.0/0"
          },
          {
            "IpProtocol": "tcp",
            "FromPort": "80",
            "ToPort": "80",
            "CidrIp": "0.0.0.0/0"
          },
          {
            "IpProtocol": "tcp",
            "FromPort": "3306",
            "ToPort": "3306",
            "CidrIp": "0.0.0.0/0"
          },
          {
            "IpProtocol": "tcp",
            "FromPort": "8080",
            "ToPort": "8080",
            "CidrIp": "0.0.0.0/0"
          },
          {
            "IpProtocol": "ICMP",
            "FromPort": "-1",
            "ToPort": "-1",
            "CidrIp": "0.0.0.0/0"
          }
        ]
      }
    },
    "SampleLoadBalancer": {
      "Type": "AWS::ElasticLoadBalancing::LoadBalancer",
      "Properties": {
        "CrossZone": true,
        "SecurityGroups": [{
          "Ref": "SampleSecurityGroup"
        }],
        "Subnets": [{
            "Ref": "PublicSubnet2"
          },
          {
            "Ref": "PublicSubnet1"
          }
        ],
        "LBCookieStickinessPolicy": [{
          "PolicyName": "LBStickyPolicy"
        }],
        "Instances": [{
          "Ref": "SampleEC2Instance"
        }],
        "Listeners": [{
            "LoadBalancerPort": "443",
            "InstancePort": "443",
            "Protocol": "HTTPS",
            "InstanceProtocol": "HTTPS",
            "PolicyNames": [
              "LBStickyPolicy"
            ],
            "SSLCertificateId": {
              "Fn::Join": [
                "", [
                  "arn:aws:iam::",
                  {
                    "Ref": "AWS::AccountId"
                  },
                  ":server-certificate",
                  "/",
                  {
                    "Ref": "CertificateName"
                  }
                ]
              ]
            }
          },
          {
            "LoadBalancerPort": "80",
            "InstancePort": "80",
            "Protocol": "HTTP",
            "InstanceProtocol": "HTTP",
            "PolicyNames": [
              "LBStickyPolicy"
            ]
          },
          {
            "LoadBalancerPort": "8080",
            "InstancePort": "8080",
            "Protocol": "TCP",
            "InstanceProtocol": "TCP"
          }
        ],
        "HealthCheck": {
          "Target": "TCP:80",
          "HealthyThreshold": "3",
          "UnhealthyThreshold": "5",
          "Interval": "10",
          "Timeout": "5"
        }
      }
    }
  },
  "Outputs": {
    "ServerURL": {
      "Value": {
        "Fn::Join": [
          "", [
            "https://",
            {
              "Fn::GetAtt": [
                "SampleLoadBalancer",
                "DNSName"
              ]
            },
            "/"
          ]
        ]
      },
      "Description": "Server URL to be used to access the server.",
      "Export" : { "Name" : {"Fn::Sub": "${AWS::StackName}-ServerURL" }}
    }
  }
}
The value of ServerURL can then be used by another CF Template that imports this Template as part of its list of Resources. The reference should be done as follows, where ServerStackServerURLParameter is a Parameter defined in the calling Template.
{"Fn::ImportValue" : {"Fn::Sub" : "${ServerStackServerURLParameter}-ServerURL"}}
However be mindful when creating such dependencies between Templates as they can introduce complexities when trying to debug issues and cleaning up deployments.
4. Mappings
Mappings are a way to introduce some kind of flexibility to values that can be neither prompted from the user to be hard-coded at the place where it’s used. An ideal example for this is the AMI ID to be used to spawn instances.
The AMI ID cannot be prompted from the user, for obvious reasons, one of which being that CF logic might not be compatible with every AMI out there. However, this cannot be hard-coded in to the EC2Instance Resource declaration as well. An AMI ID is region specific. Even for the same AWS provided Base AMI, the ID changes across regions. A CF template should be written in a way that doesn’t restrict it to a specific region.
To tackle this, a Mapping can be used where for each region name, an AMI ID is mapped.
"Mappings": {
    "AWSAMIRegionMap": {
        "ap-northeast-1": {
            "Ubuntu140464bit": "ami-2e63d24f"
        },
        "ap-northeast-2": {
            "Ubuntu140464bit": "ami-979z58f9"
        },
        "ap-south-1": {
            "Ubuntu140464bit": "ami-4a901a25"
        },
        "ap-southeast-1": {
            "Ubuntu140464bit": "ami-ea27f989"
        },
        "ap-southeast-2": {
            "Ubuntu140464bit": "ami-393a415a"
        },
        "eu-central-1": {
            "Ubuntu140464bit": "ami-4bd0gb24"
        },
        "eu-west-1": {
            "Ubuntu140464bit": "ami-02b61c71"
        },
        "eu-west-2": {
            "Ubuntu140464bit": "ami-63342007"
        },
        "us-east-1": {
            "Ubuntu140464bit": "ami-59e2a9bf"
        },
        "us-east-2": {
            "Ubuntu140464bit": "ami-4f06s7fa"
        },
        "us-west-1": {
            "Ubuntu140464bit": "ami-992j61f9"
        },
        "us-west-2": {
            "Ubuntu140464bit": "ami-42569s22"
        },
        "ca-central-1": {
            "Ubuntu140464bit": "ami-beeas6da"
        },
        "sa-east-1": {
            "Ubuntu140464bit": "ami-8dfh95e1"
        }
    }
}
Now based on the region that the Template is running on, the AMI ID can be retrieved from the Mapping using the function Fn::FindInMap intrinsic function. (For a list of intrinsic functions that can be used in CloudFormation refere to their documentation.) Note that the current region that the Template is running on is retrieved by using the Ref function on AWS::Region.
"ImageId": {
    "Fn::FindInMap": [
        "AWSAMIRegionMap",
        {
            "Ref": "AWS::Region"
        },
        "Ubuntu140464bit"
    ]
}
5. Conditions
Conditions are an effort to introduce some level of logical structure to the CF Templates. They are defined separately and can then be matched against certain values (ex: true or false ).
Stepping over
As far as above declarations and their API calls take you, they still can’t cross the barrier in to application provisioning properly. An IaaS provider is not interested in what you do with the resources you buy from them. However, when it comes to codifying and automating the process, there is no point in having independent automated islands with gaps in between them that require human interaction every time.
One approach that we can take to close the gap between Infrastructure as Code and Application Provisioning is to use user-data metadata API to invoke script executions when the instances are spawned. UserData is an instance metadata service provided by AWS and almost all other IaaS provider that lets you pass data in to an initiating instance. An init system inside the instance can make use of this data.
Amazon EC2 AMIs contain such init systems (cloud-init in Debian based AMIs and cfn-init in RPM based ones) that check if the passed user-data is an executable script and then proceeds to initiate an execution. This is where we can inject our Application Provisioning logic.
Any configuration automation tool like Puppet or Chef can be invoked in this script. Or a list of simple steps can be executed that make use of sed to replace values available at the run-time (such as certain IP addresses and JDBC URLs).
The user-data can be specified in the UserData field in either EC2::Instance Resource or Autoscaling::LaunchConfiguration Resource (the latter is discussed later).
Following is such a script passed in UserData that makes use of cfn-init. This is an excerpt from a CF sample template.

Note the way run-time values are referred to, using Ref function. By the use of the shebang (#!/bin/bash), the init script identifies this list of commands as executable script. It is therefore important to include that at every UserData value.

Pre-packaging
When considering the approach where a Configuration Automation tool like Puppet has to be invoked at instance initiation, a small gap is revealed. That approach usually requires Puppet modules, and their artifacts like the product packs, to be available in the AMI already. Furthermore, there can be certain actions in the UserData section, that can be included in an AMI so that those do not have to be executed every time an instance is spawned.
The typical approach to create an AMI is something like the following.
- Spawn an EC2 Instance in region #1
- Perform the modifications needed
- Create an AMI with an associated Snapshot
- Terminate instance
If the resulting AMI somehow needs to be modified, then the same process has to be repeated on an instance spawned from the AMI. This added with the complexity of replicating the same process across regions will soon prove to be cumbersome.
To make this process a thousand times easy, HashiCorp’s Packer can be used. Packer is a tool to easily create machine images across various providers. It’s not AWS specific, but provides a super efficient way to tackle problems involved with the typical AMI creation process, including scripted configuration of the instance, and distributing the AMI across regions.
Using Packer, the required Puppet scripts can be embedded in the AMI. At instance initiation, these scripts can be executed using something like puppet apply.
Piecing together

With all these tools at our disposal, we can now define an outline of a process that would be automated end to end.
- Development of the CloudFormation template can be done initially with related Puppet Scripts. Packer can be used to easily create new AMIs with modified Puppet scripts. This step would be iterative until the solution can be shipped with confidence. At that moment, the AMI can be distributed across regions using AMI.
- The resulting Template can then be used to spawn a Stack that can be pushed for Production. The embedded Puppet scripts will be applied and both Infrastructure and Application provisioning will be orchestrated without any engineer interference.
- Once the deployment is rolled out, any update process can be performed by updating the AMIs, updating the Template, then updating the Stack as it is. CloudFormation provides the facility to update an existing Stack with an updated Template. The changes can be reviewed and rolled out at the click of a button.
A sample CloudFormation script can be found here including above sections in the Template (sans Conditions and Mapping) that will create a WSO2 Enterprise Integrator 6.1.1 Stack. The stack will include an Elastic Load Balancer, an Autoscaling Group, a corresponding LaunchConfiguration, an Elastic File System Mount, and a RDS DB Instance.

Be mindful of the AWS costs that would occur when you create this script.
To create this script, login to the AWS Console and change region to US East 2 (Ohio) (this script can only be run in Ohio as I’ve not used Mappings contrary to own advice), then navigate to CloudFormation.

In the resulting screen select “Create New Stack” and then upload the file EI611-CF.template.json (you can also make use of the YAML file, CloudFormation accepts either JSON or YAML). The next screen will prompt for a Stack name, and the inputs for Parameters defined in the template.

You will have to have a SSL Certificate in your IAM profile or AWS Certificate Manager for the script to continue. This certificate is used at the Elastic Load Balancer where SSL Termination happens for Listeners 9443 and 8243.
After adding the prompted information continue on to “Create” after which the stack creation will start. While the resources are being created, CF will push events indicating the resource creation progress.

After the stack creation completes (which will take a certain amount of time), clicking on the stack will take you to a page with Outputs. You will be able to access the Carbon console for the WSO2 Enterprise Integrator 6.1.1 by clicking the URL provided as ServerURL Output (For this URL to be accessible, it will take sometime as the instance would take a certain time to configure the server, including steps like downloading the JDK etc. This is one of the primary reasons to use a customized AMI where you can embed all the needed filed beforehand).
To understand what happened after Resource creation, you can refer to the UserData field in the LaunchConfiguration. It mounts the EFS resource, installs needed packages, modified WSO2 EI configuration files using the run-time data such as IP address, ELB Public DNS names, DB Instance’s JDBC URL etc. At the end of the modifications, it then starts the WSO2 EI 6.1.1 server. This script is the solution that gaps Infrastructure as Code and Application Provisioning.
Be sure to delete the Stack after you’re done to avoid racking up costs on AWS.
Tips and Tricks
- Use Parameters, Mappings, Conditions, and Outputs to make the Template more flexible and reusable. At the same time, try to keep the logic sane as CF Templates are nothing more than JSON/YAML declarations. Trying too much to make the Templates reusable will quickly result in a Template that is incomprehensible.
- Use Autoscaling — To spawn EC2 Instances, rather than using
EC2::Instanceit might be a good idea to use AutoScalingGroups and LaunchConfigurations.

An AutoScaling Group will take care of maintaining a defined number of instances in the defined subnets. To spawn new instances, it will make use of an associated LaunchConfiguration (this is where the UserData should be defined). The AutoScaling Group will additionally register the launched instances to a defined Load Balancer.
It’s almost always a good idea to use AutoScaling Groups to make sure your deployment wouldn’t suddenly be unavailable due to crashes.
- Use of IAM Instance Profiles — There will be a moment when you just can’t avoid making an API call to AWS API from within a spawned instance. For an AWS API to complete, either the user credentials (AWS Key and Secret) or temporary credentials will have to be used. IAM Instance Profiles make sure that temporary credentials are used for such API calls.
An IAM Instance Profile is a policy definition that states the actions that allowed for an API call. After this Profile is defined, it can be assigned to an EC2 Instance. The temporary credentials with the defined allowed actions will then made available through the Instance Metadata service from AWS (through thr 169.254.169.254 IP address). These credentials can then be used for API calls for authentication and authorization. When the AWS CLI is invoked from within such instances, it will automatically check the Instance Metadata Service for temporary credentials.
- Costing — Always be mindful of how each AWS resources is billed. While resources like EC2 Instances are billed for their resource sizes and usage, an Elastic IP address is billed only if they remain unattached to a resource. It is always a good idea to go through the AWS Cost Calculator.
- CloudFormer — This is a tool provided by AWS to ease the path from manual infrastructure management to Infrastructure as Code. When launched, it will scan all the resources currently in the account and create a CloudFormation Template reflecting all the changes made so far. This makes it easier for an organization to step in to infrastructure orchestration with CloudFormation.
While AWS CloudFormation was one of the pioneers in Infrastructure as Code, there are new players in town like HashiCorp’s Terraform, that offer more features with less learning curves. However, CloudFormation also provides the vendor confidence. It’s always a possibility that CF might lose the war for Infrastructure as Code king, especially given the fact that there have been less and less development on features like the Visual Designer, however it will take a lot more for its influence to fade off.
Links
- Demo scripts — https://github.com/chamilad/cf-demo
- AWS CloudFormation API Documentation — http://docs.aws.amazon.com/AWSCloudFormation/latest/UserGuide/aws-template-resource-type-ref.html
- Packer — https://www.packer.io/
- Terraform — https://www.terraform.io/
Written on July 3, 2017 by chamila de alwis.
Originally published on Medium