This is going to be multiple videos for various reasons. First video is below.
In this installment of the series on authenticating into AWS from K8s workloads, I’m going to go into details on another major approach that can be used. This approach is called IAM Roles for Service Accounts (IRSA), and that adds nothing to explaining what this approach is. If you remember from the first video, almost all approaches use IAM Roles that are mapped to Service Accounts somehow (unless you’re embedding IAM user credentials in the Pod definition, for the upteenth time, let me strongly advise you not to do that).
What’s different about IRSA is how trust is established between K8s and AWS for that mapping to work.
In EKS Pod Identities, this isn’t a big deal. Pod Identities can only be used in EKS (even then in certain EKS worker nodes), so setting up trust is a matter of assigning the correct IAM Intance Profile to the EKS worker nodes.
So what’s the actual design for this approach?
Architecture

Unlike the last video, I’ll go directly to explaining the architecture here, because this approach needs a lot of setup. Setting IRSA up requires knowing about the design complexities. You might recall from the last video, one of the most attractive features of EKS Pod Identities was how it hid the underlying complexity from the end user. It does it so well that I could do a demo first, and then go to an architecture discussion, without confusing the viewer.
That is not the case for IRSA, and that was why EKS Pod Identities was developed in the fist place. IRSA was too complex to set up and maintain as far as a solution for identity management goes.
Well, if EKS Pod Identities have superceded IRSA, why am I talking about it anymore?
As I discussed in the last video, EKS Pod Identities have several limitations. They can only be used on EKS, and even in EKS, you can only use it on EC2 backed Pods, not Fargate. You can’t use it on K8s clusters that are outside EKS, even if your control plane is in EC2. Forget clusters that are outside AWS, but still need to access AWS services.
This is where IRSA comes in. It can be used on almost any case to build a trust relationship between workloads in K8s and AWS.
So enough preamble, let’s get into the details.
IRSA at its core is about getting access into AWS as federated IAM principals.
That’s the single sentence pitch. Now let’s break that down a bit.
I talked about self-contained tokens (a.k.a. JWT) issued by Service Account Projected Token Volume type in the last video a bit. This was helpful in EKS Pod Identities scenario if we wanted to implement more granular trust policies for the IAM Roles. In IRSA, this is going to be the key aspect of the implementation.
The process in the K8s Pod will present a token to AWS that is signed by a party that AWS already trusts. Federated IAM Users is an existing concept that has been used to allow more users than the hard limit of 5000 IAM users per region. We can use this to present the K8s workloads as federated IAM principals.
After this hurdle, it’s a matter of scoping the level of access per workload. We should be able to map the workload token to a certain IAM Role so that the holder of that token is able to assume only the roles assigned to it.
If we break down these two high level steps, at a slightly more detailed level, the process is to,
- establish an IAM federated identity provider that uses the K8s Service Account Issuer Discovery details
- configure K8s so that after being assigned a mapped Service Account, when the AWS SDK in the Pod triggers the Credentials Provider Chain, it uses the Assume Role Provider for Web Identity or OIDC
- map a Service Account to an IAM Role by annotating the Service Account
- AWS verifying the token provided as a valid IAM principal, and allowing the
AssumeRoleWithWebIdentityoperation - the Pod using the short term credentials retrieved through the Assume Role operation
Now, this sounds easy enough right? It’s just a few simple steps right?
Not exactly. Nothing in life really is.
Let’s take a look at a somewhat more detailed diagram.
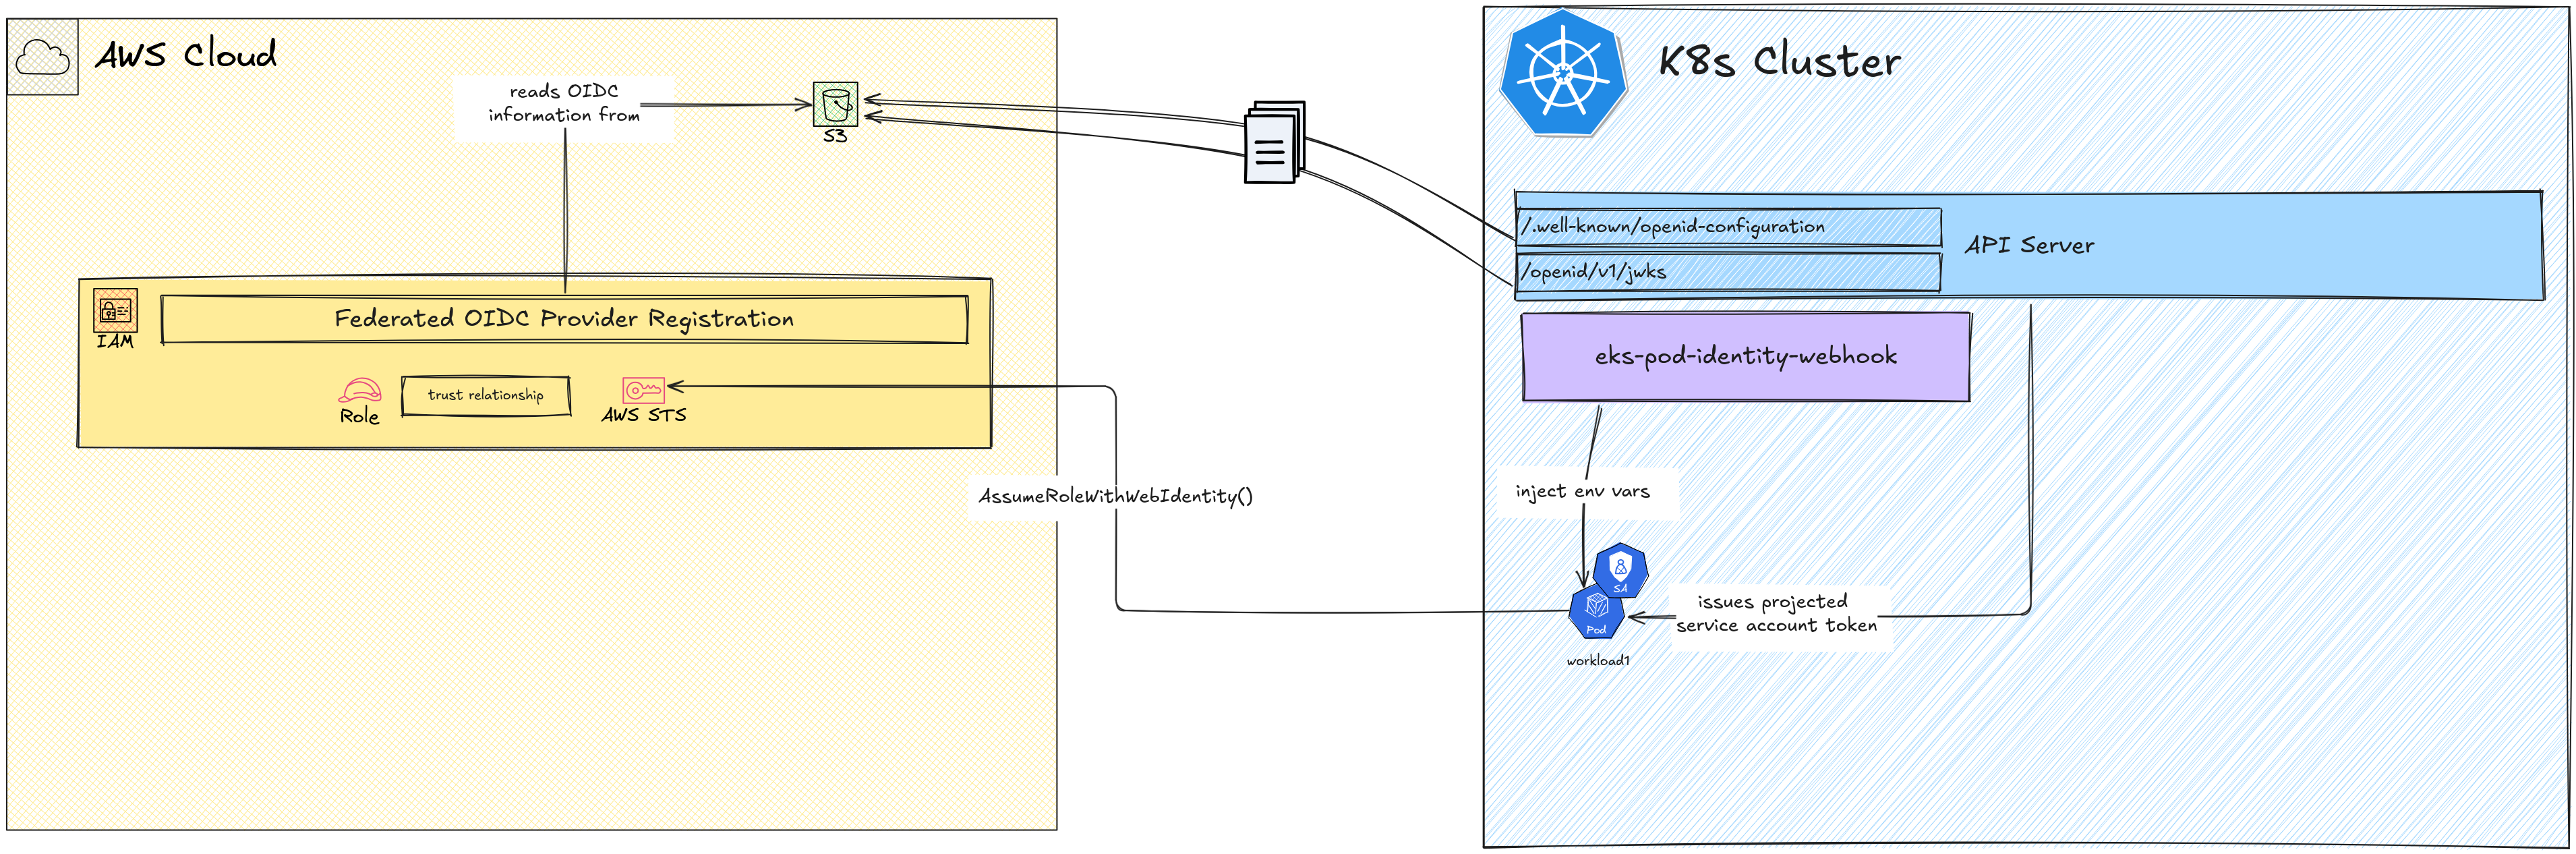
IAM Identity Provider
The key step in IRSA, the main step that establishes the trust is not so straightforward as registering a federated Identity Provider in IAM. There are few details involved here as this is not a typical federated IDP vs relying party situation.
In AWS, federated Identity Providers are supported as long as they are either SAML or OIDC compliant. That means, the IDP should implement SAML or OIDC API endpoints that AWS will use to
- discover identity provider details such as signing keys etc
- verify tokens provided by users against the provider
In most cases, this require a full implementation of either SAML or OIDC specifications. However K8s does not provide any full implementation of SAML or OIDC.
What it does provide is a partial (or what barely passes as partial) implementation of the OIDC discovery endpoint, where the OIDC configuration details such as issuer ID, signing key location, and signing algorithms. It also provides an API that provides the signing public key that can be used to verify any token signed by the private key.
These are available at <API_ENDPOINT>/.well-known/openid-configuration and
<API_ENDPOINT>/oidc/v1/jwks URLs. These are standard URLs as specified by the
OIDC
specification,
but I should re-iterate that K8s is not a full-blown OIDC
compliant IDP. It just implements these two endpoints to provide a wayt to
provide the additional details that might be needed by an external relying party
to verify the tokens that K8s issues.
Following are sample OpenID Configuration and signing key configuration responses you would see if you ping these two endpoints.
{
  "issuer": "https://kubernetes.default.svc.cluster.local",
  "jwks_uri": "https://172.20.0.2:6443/openid/v1/jwks",
  "response_types_supported": [
    "id_token"
  ],
  "subject_types_supported": [
    "public"
  ],
  "id_token_signing_alg_values_supported": [
    "RS256"
  ]
}
{
  "keys": [
    {
      "use": "sig",
      "kty": "RSA",
      "kid": "JDsL136WibCBwUlFaU9_UpPYwYYONrM5xgBh85d_JC0",
      "alg": "RS256",
      "n": "4u1ye6SUKCCLcziQj4__uJI77U-RElqPqchgoCeU9OQHc7UugvuF2uqlMKgVK8qVm7Yb69TAvJ3bGD53MgsYTh0qqQTH8BjkLP0WCm4ri9QVrMzmJkJd5yW8ERJizEHks84nLKYv5DcCYyJVFWrd9eKnAAnQcDJVDSydG0mkhnjMzZOeb3gvibgzQ0hlmvgYKyeYMNR63KTJv-mKlyDeJS7sanyHSwBD1CE81-WFM61QuRC9hWwclpH33BaKuV9-URYHdcf0MVKrzBtwWVOXBBIIFVEZT_-Qi3CmcDXLy6-9R2R-dQjb1FWmfl6Cb6n3UFfCBYacQH1rZ8AiQkbCDw",
      "e": "AQAB"
    }
  ]
}
So in theory, all we have to do is to point AWS IAM Provider registration to these endpoints and the registration should be done, right?
Not exactly (I keep using that phrase a lot).
That could have been the case if the K8s Control Plane API was public for AWS IAM to reach it. However, most K8s Control Plane APIs are not public, and exposing it publicly is usually a huge security risk.
The workaround here is to offset the OIDC discovery details to a place that is actually publicly reachable. That is to move the OIDC configuration file and the signing key file in JWKS (JSON Web Key Set) format to an S3 Bucket that is publicly reachable.
However, this also means the OIDC configuration details like Issuer URL and the JWKS URL should also change to reflect the location change. For an example the above OpenID Configuration should change to reflect the real HTTP URL of the S3 bucket hosting the files.
One way to do this to download the configuration from the K8s API and change it
manually, however the tokens generated by the Service Accounts also need to
reflect the same changes, such as their iss claim (which contains the Issuer)
if the token is to be verified correctly.
So these values have to be “baked into” the API server for the change to be effective.
That is, even before we download these two artefacts, we should create the S3 bucket that we are going to host them in.
You can use an entire S3 bucket per K8s cluster in this case, or it could be a single S3 bucket that you can re-use for other clusters or even other purposes depending on the bucket access policy.
For this case, I’m going to re-use a bucket that I have for public access and later host the OIDC discovery spec under a specific prefix.
Once the S3 bucket is created, the following details should be updated in the K8s API server configuration.
--service-account-issuer- This should reflect the full HTTP URL for the location inside the S3 bucket. If the S3 bucket you’re using is a fresh one, then you can build this URL with the formathttps://<BUCKET_NAME>.s3.<REGION>.amazonaws.com/<PREFIX>/. If you’re editing this value for a cluster that has been running for some time, and has existing relying parties that are verifying existing JWTs, then you can add the new S3 URL as a new argument (there can be multiple occurrances of this argument) at the end. K8s will sill vouch for tokens with the older issuer URLs, but only issue tokens with the new (the last specified) URL.--service-account-key-file- This value is usually unchanged, unless you’re switching to your own signing keys. In this case, I’m going to keep the value the same.--service-account-signing-key-file- same as #2 above, keep the same unless you have a specific signing key setup.--api-audiences- This specifies the value for theaudclaim in the JWTs issued by K8s. For this case, I’m going to specifyawsstsas the audience to be used if the audience is not specified at the time the token is created. We can override this at the Service Account level as well.
After the values are updated, restart the API server. If you’re using a
kubeadm setup, this is probably just a matter of editing the static pod
configuration for the API server at /etc/kubernetes/manifests (by default,
find the manifests location by checking the kubelet configuration if you
can’t find the manifests files here).
After the API server comes back up, make an HTTP request to the above two endpoints and write the stdout to files.
If you don’t have direct HTTP access to the control plane API, you can use
kubectl proxyto start a local proxy server. Only theAPI_ENDPOINTvalue would change to reflect the proxy server URL which would be something likehttp://127.0.0.1:8001.
After downloading the openid-configuration file, modify the .jwks_uri field
to reflect the S3 bucket HTTP URL. This is where any relying party should look
for the keys, not the internal K8s URL.
After the openid-configuration and jwks files are created from the
responses from the OIDC discovery endpoints in the K8s cluster, we can upload
them to the S3 bucket. When doing this, they should be uploaded to the same
locations as the OIDC discovery spec. That means, the two files should be
available at <S3_BUCKET_URL>/.well-known/openid-configuration and
<S3_BUCKET_URL>/openid/v1/jwks.
Now we should expose these two files to be publicly accessible. For that I’m
going to add a bucket policy that allows s3:GetObject operations by any
principal (even unauthenticated) to go through if the resources are these two
files.
For this, I’m first going to modify the Public Access settings so that it allows new bucket policies that allow public access. This is why you should probably use a dedicated bucket that will not have potentially sensitive documents in the bucket. If you use a bucket that contains or could contain sensitive data, they will be only a bucket policy away from being exposed. Security is job zero innit
I’m going to add this bucket policy then to the bucket, which as granular as it can be.
{
	"Version": "2012-10-17",
	"Statement": [
		{
			"Sid": "AllowOpenIDConfigPUBLICAccess",
			"Resource": [
			    "arn:aws:s3:::772237238044736-k8s/prefix/.well-known/openid-configuration",
			    "arn:aws:s3:::772237238044736-k8s/prefix/openid/v1/jwks"
			    ],
			"Principal": "*",
			"Effect": "Allow",
			"Action": [
			    "s3:GetObject"
			    ]
		}
	]
}
After adding this policy, I’m going to go back and “close the door”, and block any new bucket policy allowing new public access. It’s good to practice these this even if you think you are not at risk. You are always at risk.
Okay, so now that the OIDC discovery spec for the K8s cluster has been offset to the S3 bucket, we can finally start registering it as an IAM federated provider.
Configure Pod Environment Variables
In the last video, I talked about the AWS SDK Credentials Loading Chain. In Pod Identities, one of the latest providers in the chain is being used, the Container Credentials Provider.
In IRSA we are going to depend on the same provider chain, but a different provider called Assume Role with Web Identity Provider. The environment variables that if present will trigger this provider are,
AWS_ROLE_ARN- the ARN of the AWS role to assumeAWS_WEB_IDENTITY_TOKEN_FILE- the location of the token that should be used to authenticate into AWS
If we have a valid AWS IAM role ARN that allows assuming it using the token file provided by the 2nd environment variable, then we are all set to get temporary credentials.
We can specify the Role ARN manually for different Pods if needed. However, like EKS Pod Identities, Roles are better mapped to Service Accounts than individual Pods as a concept, because you’d be separating different kinds of access along the Service Account level.
The token itself we’re using is the Projected Token that is generated by the Service Account mount operation.
So there should be a way to,
- map a Service Account to Role and specify the role ARN as the value for
AWS_ROLE_ARN - mount the Service Account token as a projected volume and specify the
location of the token as the value for
AWS_WEB_IDENTITY_TOKEN_FILE
The best way to get this done is to use something we are already familiar with, the EKS Pod Identity Webhook.
Despite its name, the EKS Pod Identity Webhook at its core is a mutating webhook that can inject AWS SDK related environment variables for both the Container Credentials provider and the Assume Role provider. In fact, the webhook original code is for injecting Assume Role provider related environment variables, not the Container Credentials provider related ones. The latter is a feature added by a PR last year.
In the last video, I only had to enable Pod Identity Agent to add the Pod Identity Webhook to the EKS cluster. In this demo, I’m going to manually install the Webhook from the public Docker image.
CertManager is a dependency for Webhook, which takes care of the mTLS when it comes to clients talking the the Webhook endpoint.
The Webhook is a registered HTTPS endpoint that the K8s API will talk to when a Pod is scheduled (it can be called for more events, but Pod creation is the only event we are going to register the Webhook for). It needs to be secured over a TLS connection, and CertManager takes care of issueing certificates in such a scenario.
I’ve noticed some issues when installing CertManager from the static artefacts, and complete reinstallation seems to be the way to go.
After CertManager is installed, we can go ahead and install the Webhook using the artefacts provided in the Webhook Github repository.
Before applying these artefacts on K8s cluster, a couple of changes have to be made.
- the image of the Webhook deployment has to be configured to
amazon/amazon-eks-pod-identity-webhook:latest - the default value for the token audience claim has to be configured to the correct value
(the value we used above was
awssts)
After changing these two values, the resources can be deployed by applying the following files in order.
deploy/auth.yamldeploy/deployment-base.yamldeploy/service.yamldeploy/mutatingwebhook.yaml
By default, these are deployed in the
defaultnamespace. This can get messy, and generally it’s a good idea to keep things like mutating webhooks in their own namespaces. To do this, a couple namespace values have to be changed in the artefacts in addition to another couple of places that has values like URLs and certificate names. I’ll cover this briefly after the main part of the video.
If there’s an issue with the deployment, the resources can be deleted and recreated. However, the Secret that gets created after the Certificate is signed by CertManager does not get deleted if you use
kubectl delete -f <file.yaml>. If you are redeploying the Webhook, make sure to delete the Secretpod-identity-webhook-certmanually.
Wait until the Webhook pod comes up to Ready state and you’re ready for your pods to be mutated.
Now, the Webhook will get called on every Pod creation request. It will,
- check if there’s a Service Account attached to the the Pod
- check if the Service Account has a specific annotation that has the value of an IAM role ARN
- create a Projected Volume Token for the Service Account and mount it to a specific location inside the Pod
- add the above two environment variables
(
AWS_ROLE_ARN,AWS_WEB_IDENTITY_TOKEN_FILE) to the Pod specification before the Pod is started
There’s a tiny bit of a detail I’m keeping out. The Webhook actually keeps tabs of the Service Account configuration in an in-memory cache, that it keeps refreshed after it starts. When a Pod creation request is passed to the mutating webhook, it looks up the Service Account from this cache to see if it’s something that needs the above work. Of course, this detail isn’t really necessary for an end-user (Cloud/DevOps engineer) to configure IRSA.
Now we have a scalable method to inject specific details into the Pod to be
able to perform an AssumeRoleWithWebIdentity call.
IAM Role and the Service Account
Now we can create a Service Account and an IAM Role for that Service Account to assume.
Like the first step of creating the IAM federated provider step, we are going to need information from both sides to complete both steps.
Let’s first create a Service Account. This is not special knowledge, just a
plain old kubectl create sa read-s3-hello will create Service Account named
read-s3-hello in the namespace you need.
The next step is to create the IAM Role that Service Account will try to assume.
I’m going to use the same IAM role that I used in the last video, that has a permission policy that allows access to a specific S3 bucket (not the same one we used above the IAM federated identity discovery). We just have to edit the trust policy so that the Pod with the Service Account is able to assume that role.
For this we are going to need the ARN of the Federated IDP we configured in IAM. As a first step, I’m going to allow any token that is issued by this IDP to be a valid for assuming this role.
{
    "Sid": "AllowIRSAAssume",
    "Effect": "Allow",
    "Principal": {
        "Federated": "arn:aws:iam::528757791498:oidc-provider/772237238044736-k8s.s3.ap-southeast-2.amazonaws.com/prefix/"
    },
    "Action": "sts:AssumeRoleWithWebIdentity"
}
On the K8s side, we have to annotate the Service Account so that the Webhook
knows which value to set to AWS_ROLE_ARN environment variable. For this, the
annotation eks.amazonaws.com/role-arn is used with the ARN of the role as the
value.
The default audience value of
awsstscan also be overridden per Service Account, using the annotationeks.amazonaws.com/audience.
The annotation prefix
eks.amazonaws.comis also configurable. If you’re running your k8s cluster outside of EKS and this prefix bothers you, override it in the Webhook configuration using the flag--annotation-prefixflag.
Creating the Pod and Testing Access
We’ve finally completed IRSA configuration. Now let’s test this setup by trying to access the specific object in S3 that our Role allows in its permissions.
For this I’m going to launch a Pod with the AWS CLI base image and keep it
running for 1 hour to exec in and perform s3api get-object. I’m going to
modify the Pod specification so that it uses the Service Account I created in
the previous step.
After launching this Pod, we can see the two environment variables and the volume mount in the Pod description.
If I exec into the Pod and run aws s3api get-object I’m able to download
the specific object because I’ve been provided temporary credentials from the
AssumeRoleWithWebIdentity operation.

Optmisations
Now, although it took some time, we have a basic IRSA setup. Let’s optimise
this a bit more to cut down broad trust policies and even move some of the
generic stuff we deployed in the default namespace.
Restrict Who Can Assume Role based on Service Account Name
When modifying the IAM Role’s trust policy, I specified that any token issued by the federated provider, i.e. K8s API server, can be used to assume the role. This could be too broad of a trust policy in some cases, especially if you run a setup where different namespaces are delegated to different teams, or event if you have multiple workloads with different levels of access running in the same namespace.
In these cases, you will need to restrict the trust policy by specifying more conditions.
For an example, if I launch another Pod with another Service Account with this Role’s ARN as the annotation value in a different namespace, AWS will still let the assume role operation through.
I can lock that down by specifying a condition that let’s Service Accounts from
only a specific namespace (in this case default) are able to assume the role.
For this, we can filter based on the claims present in the JWT passed in from
the Pod, the specific claim being "kubernetes.io".namespace.
We can lock this down further by only letting a single Service Account from
that namespace to assume the role by specifying a condition that
depends on the sub claim where the value would be
system:serviceaccount:<namespace>:<service-account-name>. This could be way
to achieve the true end goal of Role per Service Account mapping.
Deploying the Webhook in a Dedicated Namespace
In the previous steps, we forged through to get the IRSA deployment done, so we
kinda let go of some best practices. One of these is not deploying Control
Plane related workloads in the default namespace. We deployed the Pod
Identity Webhook in the default namespace, because that’s what the provided
artefacts specify.
Let’s remove this Webhook and redeploy it properly in a dedicated namespace. I’m going to remove the Pods that are already deployed as well.
Let’s first create a dedicated namespace called irsa-webhook.
There are couple of places the artefacts specify the default namespace. The
obvious places are the metadata.namespace field. However there are few other
places that require changes as well.
- the
--namespaceflag for the Webhook Pod should beirsa-webhook - the
spec.commonNamefor the Pod Identity Webhook Certificate ispod-identity-webhook.default.svc, which should be changed topod-identity-webhook.irsa-webhook.svc - the
spec.dnsNamesarray that contains values likepod-identity-webhook.defaultshould change topod-identity-webhook.irsa-webhook - the
metadata.annotations.cert-manager.io/inject-ca-fromvalue for theMutatingWebhookConfigurationshould reflect the namespace change
After these places are changed, redeploy the artefacts, and you should be good to use it as before. Let’s test it with a Pod deployment.
Conclusion
So that was a detailed breakdown of the IRSA architecture and a demo to make things clear.
As it’s clear from the demo, it’s almost impossible to do a “simple” demo first and then talk about the architecture, because everything that needs to happen in the demo needs an explanation. If you don’t know the architecture, you’ll have a hard time following the demo.
This is why I mentioned in the last video that EKS Pod Identities hide the complexity below a nice opaque layer to provide a simple experience (let’s call it OX, Operational eXperience amirite).
IRSA is the total opposite. It doesn’t hide any complexity. It’s too complex? f**k you deploy it. Here, use these artefacts with the almost outdated documentation too.
On the upside, you’d probably go for IRSA if you can’t use EKS Pod Identities for some reason. This could be if your K8s cluster is outside of AWS, or even if it in AWS it’s not using the proper EKS cluster type (well, you can’t really use IRSA in EKS in this manner because you need to be able to modify the API server manifest).
At least, if it comes to it, now you know how to deploy IRSA.