
This is a continuation of the addendum to a series of articles on ELK on K8s.
- ElasticSearch on K8s: 01 — Basic Design
- ElasticSearch on K8s: 02 — Log Collection with Filebeat
- ElasticSearch on K8s: 03 - Log Enrichment with Logstash
- ElasticSearch on K8s: 04 - Log Storage and Search with ElasticSearch
- ElasticSearch on K8s: 05 - Visualization and Production Readying
- ElasticSearch Index Management
- Authentication and Authorization for ElasticSearch: 01 - A Blueprint for Multi-tenant SSO
- Authentication and Authorization for ElasticSearch: 02 - Basic SSO with Role Assignment
- Authentication and Authorization for ElasticSearch: 03 - Multi-Tenancy with KeyCloak and Kibana
As discussed in the last article, I will try to lay out the configuration details of a usable SSO based authn/authr design for an ELK deployment. Note that for certain features mentioned in this article to work, some features that are in the paid ElasticSearch tiers have to be available.
KeyCloak in Brief
First, let’s take a look at our IDP solution. KeyCloak is an OpenSource IDP backed maintained by RedHat. The community around KeyCloak is supportive, although the mailing list is hard one to keep hold of (you get dropped off the list soon if too many emails bounce back, and for some reason my Gmail address seems to do that a lot). As an IDP, KeyCloak supports SSO through SAML and OIDC protocols. In addition to the built-in user store, KeyCloak can also make use of external user stores (for an example, the internal LDAP directory of an organization), and also can act as a IDP federator for other identity providers such as Google and Facebook.
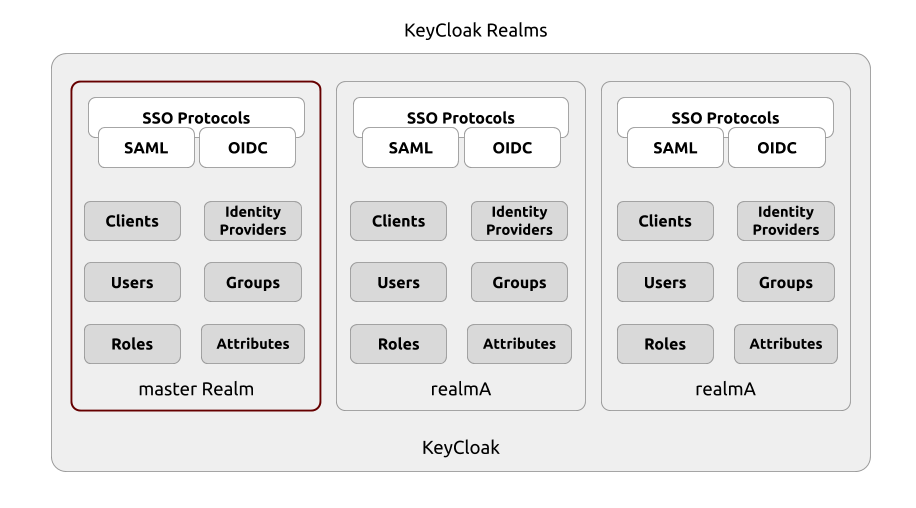
As far as multi-tenancy goes, KeyCloak implements what it calls “Realms” which can be considered as multiple instances of KeyCloak in the same JVM (KeyCloak runs on a JVM and is written using Java). Realms have their own users, groups, roles, attributes, and configurations, and for all intents and purposes, one KeyCloak Realm in the same JVM is as far away for another KeyCloak Realm as a separate KeyCloak instance on the other side of the world.
The exception to the Realm separation is the built-in realm named
masterwhich has access to all other realms as a means of administration.
For the purposes of this article, KeyCloak’s support for OIDC, SAML, and the concept of Realms will be used in the SSO and multi-tenancy design.
Authentication with no Multitenancy
Enabling an external IDP based authentication in ElasticSearch is somewhat straightforward. We just need to configure the IDP for ElasticSearch and point ElasticSearch to the proper IDP endpoint for the selected SSO protocol. For this to work, both parties (the Service Provider and the Identity Provider) should be resolvable at the end user’s terminal.
We will first configure KeyCloak to include configuration about the Kibana Service Provider and generate a Client for Kibana to use to initiate SAML communication. These information will then be used to configure ElasticSearch and Kibana to direct them to KeyCloak Identity Management instead of Basic Auth being used by default.
For the following configuration snippets, these URLs are assumed.
https://keycloak.my.org- KeyCloak URL. A realm namedelasticwill be used as the auth realm for Kibana.https://kibana.my.org- Kibana URL.
Configuring KeyCloak - 01 - Client Configuration
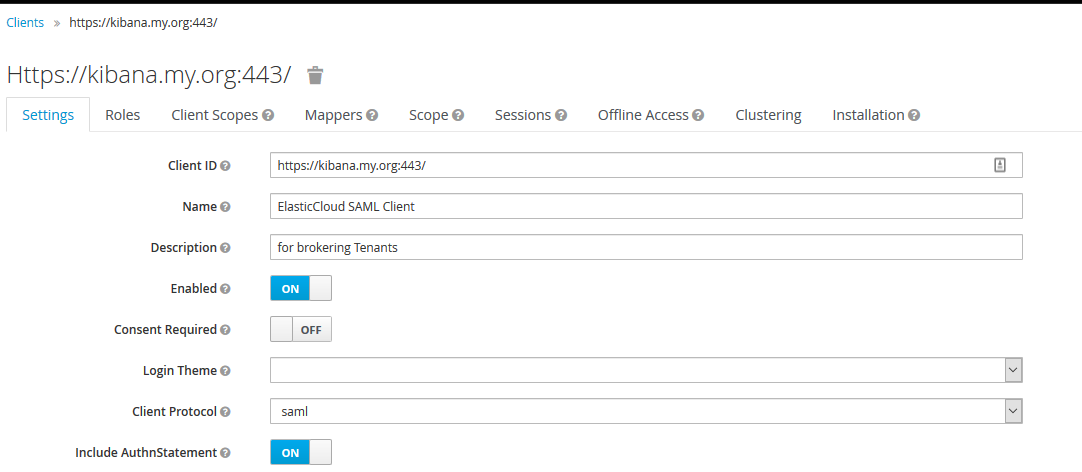
For KeyCloak, we can use a single Realm as an IDP for ElasticSearch. Each Realm has a concept called Clients which are configurations for Service Providers that will be using the Realm as an IDP. Clients are of different types based on the communication protocol used. Since we are going to use SAML as the SSO protocol, we can create a SAML client in the selected KeyCloak Realm that contains the configuration for the Service Provider, which is Kibana in our case.
Although it is ElasticSearch that contains the configurations on how to do authn/authr, it is Kibana that is going to use those information to authenticate end users for our story. API access to ElasticSearch will still be using
Basic Auth, as using SSO protocol flows for API access is out of scope for these articles.
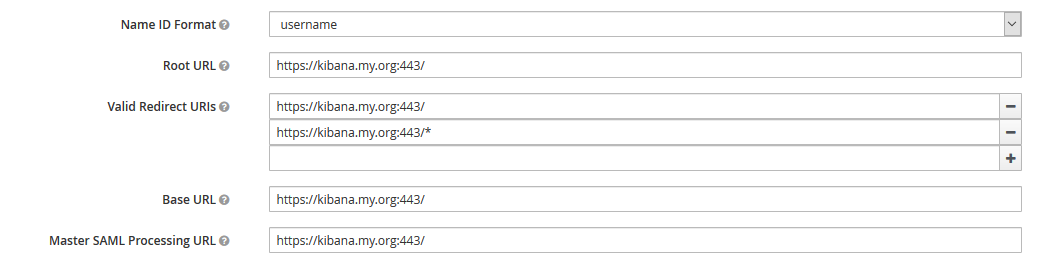
When creating a SAML client, the publicly resolvable URL of the Kibana instance has to be used. This is the URL that will be trusted to initiate the SSO flow for this client. We will also configure Kibana to use the same URL in the SAML request document for this validation to go through.
Additionally, one or more valid redirect URLs should be specified. If the incoming SAML request doesn’t have a redirect URL matching any in that list, the SSO request will be denied.
Configuring ElasticSearch - 02 - Auth Realm Configuration
On ElasticSearch, a SAML authentication configuration, otherwise known as an authentication realm, has to be created. This is specified in the elasticsearch.yml configuration file. This configuration contains the following information (for more information for the flow described here, refer to the previous article).
idp.entity_id- The valid URL of the KeyCloak Realm SAML SSO endpoint. This is where the user will be redirected to when the user accesses Kibanaidp.metadata.path- The path on the ElasticSearch server, where the SAML metadata of the KeyCloak Realm can be found. This will contain additional information such as certificates for the KeyCloak Realm, and the URLs for specific binding protocols (ex:HTTPPost,HTTPRedirect, orSOAP). The SAML metadata for a specific Realm is available at the URL<KeyCloak URL>/auth/realms/<realm-name>/protocol/saml/descriptorin the KeyCloak deployment. Alternatively, if ElasticSearch has access to KeyCloak directly (ex: IP addresses whitelisted), the direct HTTP URL to the metadata descriptor can be provided in this field.sp.entity_id- The URL to be specified in the SAML request, as the requester, the Service Provider. This is where we will be using the publicly resolvable Kibana URL that we used earlier when configuring the KeyCloak SAML Client.sp.acs- The Assertion Consumer Service URL of Kibana, where the SAML response will be consumed, and where the IDP should redirect the user with a proper SAML response. This URL should be one of the redirect URLs provided earlier when configuring the Kibana SAML Client.sp.logout- The Kibana endpoint to call on IDP initiated logouts.attributes.principalandattributes.groups- The names of the attributes on the SAML Assertion (response) that should be treated as the username and the group name of the authenticated user. These are information that will determine the authorization aspects of the process. Although these are required for the whole process of user authentication to complete, we’ll forget about these two for the moment, and will soon revisit with more contextual information.
Following is the configuration that should end up in the elasticsearch.yml file. Note that the key, xpack.security.authc.realms.saml.cloud-saml could be changed for on-premise deployment to be one that uniquely identifies this IDP configuration. However for ElasticCloud deployments, the existence of cloud-saml as the key is a must for SAML (and apparently OIDC) to work at this moment. ElasticCloud seems to work in a different way than you’d expect a managed ELK deployment to work, being restrictive about which configurations should be used in what way.
xpack:
  security:
    authc:
      realms:
        saml:
          cloud-saml:
            order: 2
            attributes.principal: "email"
            attributes.groups: "realm"
            idp.metadata.path: "/app/config/saml/metadata.xml"
            idp.entity_id: "https://keycloak.my.org/auth/realms/elastic"
            sp.entity_id: "https://kibana.my.org:443/"
            sp.acs: "https://kibana.my.org:443/api/security/v1/saml"
            sp.logout: "https://kibana.my.org:443/logout"
Note that exactly the same URLs specified earlier in KeyCloak SAML Client configuration, have to be specified here for Kibana for validations in the SAML requests and responses to work.
Configuring Kibana - 03 - Selecting Auth Realm to Use.
Kibana now has to be configured to use this authentication realm that was configured on ElasticSearch. For this, the following is put on the kibana.yml configuration file. What this configuration does is to
- Make Kibana use
samlandbasicauthentication realms in that order.basicis used here as a fallback authentication mechanism ifsamlfails. This would be the case for API access as most of the time, since there is no way for a browser based login flow to be initiated during API calls. If SAML SSO is to be associated with API calls, that has to be done using an auth flow done through browsers and using the resulting sessions details for the API calls. - Specify the details of the proxy that is fronting Kibana publicly for URL building. In our case, the URL
https://kibana.my.org:443should be used with the port number 443.
xpack.security.authProviders: [saml, basic]
server.xsrf.whitelist: [/api/security/v1/saml]
xpack.security.public:
  protocol: https
  hostname: kibana.my.org
  port: 443
At this point, the basic configurations that point the Service Provider and the Identity Provider at each other are done. Ideally these should be enough to make SSO happen for Kibana based on KeyCloak.
However, the user that will get authenticated through this process is still not properly authorized to be performing any actions on the ElasticSearch cluster. Next set of configuration steps will try to assign an ElasticSearch Role to the User through a RoleMapping, otherwise known as Role Based Access Control.
Authorization
Authorization is the process of assigning proper permissions for the already authenticated users. This will make sure that only users with predefined attributes are allowed to perform certain actions (ex: READ from indices with names matching the pattern logstash-org1*, MODIFY advanced settings in Kibana). These attributes that determine access could be as granular as something like the username (ex: specifying only username bob is allowed to perform super user tasks on ElasticSearch) to others such as KeyCloak realm name, and role mappings (ex: only users from master KeyCloak realm are able to perform super user tasks, only users with role KIBANA_ADMIN are able perform write operations such as creating visualizations).
This could be taken to another step where Kibana Space level permissions can also be leveraged (ex: only users from
realmAKeyCloak realm with role mappingKIBANA_ADMINare able to do write operations within Kibana SpaceOrganization A). This is a topic for another article to cover.
ElasticSearch Roles
How these permissions are granted to users in ElasticSearch is through Roles. An ElasticSearch Role is a grouping of Permissions, action-index lists (that specify which actions can be done on which indices), and action-space lists (that specify which actions can be done within which Kibana Spaces). In addition to the custom roles that can be created, ElasticSearch also has a few built-in Roles that enable leveraging RBAC right out of the box. For the purposes of this article, we can use one of these roles, specifically superuser Role to grant the authenticating user every permission on the ELK cluster (because Security should only be an afterthought! Yes, I am not serious).
Role Mapping for Authorization
To assign the role superuser to every user authenticating through KeyCloak, there should be a document that gets evaluated during the process of authorization. A RoleMapping is this document that contains the set of rules for the user (or to be more specific, the authentication response from the IDP) to match, and the final role (or roles, since multiple roles can be assigned to a user) to be assigned. This document has to be created by hand.
{
    "enabled": "true",
    "roles": ["superuser"],
    "rules": {"all": [
        {"field": {"realm.name": "cloud-saml"}}
    ]},
    "metadata": {"version": 1}
}
The above role mapping definition contains the following information.
- The rule set to match - In this case, there is only one rule, which is to match the authentication realm (NOT the KeyCloak Realm) to
cloud-saml. If another key was used to specify the authentication realm in ElasticSearch in the earlier step, the same key has to be used here. - The roles to assign to the subject if the rules match - The built-in role
superuseris specified as the role to assign to the user upon successful authorization.
The above role mapping can be created in ElasticSearch using an API call (since as of version 7.4 a Kibana UI feature for the same option cannot be found). Note that the definition can slightly change if your ELK stack version is different (Elastic is notoriously careless about keeping contract in its API).
curl -XPOST https://elasticsearch.my.org/_xpack/security/role_mapping/maxsecurityrole -d'
{
    "enabled": "true",
    "roles": ["superuser"],
    "rules": {"all": [
        {"field": {"realm.name": "cloud-saml"}}
    ]},
    "metadata": {"version": 1}
}
'
At this point, the users authenticating through KeyCloak should be able to perform any task inside Kibana. We have achieved a basic level of authentication and authorization with KeyCloak SSO for ELK!
Conclusion
Any unauthenticated user visiting https://kibana.my.org should now be redirected to the KeyCloak web UI (specifically the UI for the realm elastic and the Client for Kibana). If they have credentials for users in elastic KeyCloak realm, they should be able to use those credentials to log in to KeyCloak, which will then send a proper SAML Assertion document for ElasticSearch to evaluate. The role mapping that was added to ElasticSearch will kick in and assign the role superuser to the user, who will be granted access to Kibana web UI afterwards.
A couple of things to note are,
- There doesn’t have to be any whitelisting of traffic between ElasticSearch/Kibana and KeyCloak (unless
idp.metadata.pathabove points to the HTTP URL of the SAML metadata document). The default SAML binding isHTTP-Redirectwhich uses the end user’s browser as the third party through which the SP and the IDP (Kibana and KeyCloak) will communicate. On the other hand, ifHTTP-Postbinding was seelected when creating the KeyCloak Client for Kibana in the first step, then the communication paths between ElasticSearch and KeyCloak have to be cleared. - This is certainly not a step to rest at when configuring SSO. Every user who authenticates through KeyCloak has access to super user functions. There should be more granular controls that define granular access to the ELK cluster. Another article will discuss typical strategies to implement multi-tenant SSO.
- More information regarding the user has to be passed from KeyCloak to ElasticSearch as SAML Attributes in the SAML Assertion. We will investigate an approach to use Mappers in KeyCloak to add SAML Attributes dynamically.
- There is no multi-tenancy in this design. For that to happen, more decisions based on more information have to be taken during authentication and authorization process. These decisions include, which KeyCloak realm to authenticate against, which KeyCloak realms to be available to be used for authentication, which Kibana Spaces to get assigned to users from different KeyCloak realms, and which actions that users will be able to perform on which indices, among other things.
- The SAML communication configured here does not do mutual authentication of SP and IDP using PKI. Enabling this is a matter of a few configuration changes and certificate imports and will not be covered by this series of articles.
In the next article, let’s explore an approach to inject multi-tenancy into this SSO model.